I just installed my after-market Pioneer Premier DEH-P770MP headunit in the Tribute (yes, at 9:00 PM at night since I was so eager to do it) because the stock radio is garbage. I had a bit of trouble finding guides and HOWTO’s on the web on how to replace the stock headunit, so I decided to document it here on my site. There are more upcoming changes to the stock stereo, such as replacing all four stock speakers with some components and powering them through a four channel amplifier. If anyone is curious on how to do all this, read on! I don’t have any custom pictures yet, but I can guide you step by step on how to remove and disassemble your stock radio and install a spiffy aftermarket headunit that will make music sound so much better.
Okay, without further ado, here’s the parts you will need to successfully install an aftermarket radio in your Mazda Tribute 2008:
- Metra dash kit, matte black, model #99-5814 (note that you won’t find a glossy surface finish for the dash kit… at least I wasn’t able to)
- Metra Tribute 2008 wire harness, model #XSVI-5520
- Metra antenna harness, model #40-CR10
- Phillips screwdriver
- 7MM and 8MM socket (with extensions), 8MM wrench might come in handy when removing ground plug
- Torx T-15 screwdriver (I think, or T20)
- Small pry-bar or flat screwdriver (be careful with this suggestion as it’ll be used for removing dash, you don’t want something that’ll scratch the panels)
I had a bit of trouble finding the first two parts, but after realizing that the Ford Escape 2008 is an identical vehicle to the Tribute 2008, I looked up for aftermarket parts for the former and concluded that Ford parts will work for the Mazda. I went on MetraOnline.com and confirmed that the dash kit will work for my car (see the Vehicle Fit Guide). Doing a quick search on eBay landed me on the necessary parts for my car. In total, the dash kit cost me 20.00$ CDN while the harness was more expensive, coming in at 70.00$ CDN. All items shipped, the final price was 90.00$ CDN for the whole she-bang.
Before I dived into the dash installation, I prepared my wire harness. Since I had bought a harness for the Premier DEH-P770MP with my Camry, I re-used it in this application. Everything was color-coded, so it was simple to attach both harnesses together. Using butts and a crimper, I securely fastened the wires together for a nice, professional finish. I thank my friend Alex for teaching me about butt connectors!
So, now the hard part: installing everything in the car. I was a bit worried about breaking a panel or two (since the car is a lease…) but I shouldn’t have been: everything actually came off very nicely. Here are the steps to follow if you wish to remove the stock radio from your Tribute 2008:
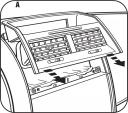
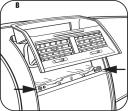
- At the top, you will notice the LCD screen that outputs song information (or “Mazda Tribute” when you start the car). You will need to remove the cover to have access to the top screws that hold the whole stock radio and climate unit in place. Start with the top of the cover (use your fingers!) and move the panel in the direction towards the back of the car. See the diagram (below) I ripped from the Metra dash kit manual. If you want, you can leave the assembly on the top of the dash or remove the plug that connects to the Passenger Airbag Off icon/light. I chose to simply let it rest on the dash.
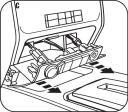
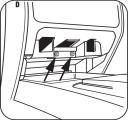
- Next step is to remove the bottom part of the unit (the 12V adapter, stability control button and auxiliary audio input chassis). This one is a bit trickier, but can still be removed if you know where the clips are (there are four). I recommend you start from the top part of the unit and get a flat screwdriver (or some fingers) in there that can pry the chassis off for you. Again, it’s going to pull out straight towards the back of the vehicle. This one will have minimum 3 wire connections; all of which you will have to disconnect (they have harnesses).
- You’re almost there. Now the fun part: remove the entire climate control and radio chassis. There are four 7MM bolts you will have to remove. The top two are easy to remove, while the bottom two might need an extension to the socket wrench (or else you’ll be scratching your dashboard endlessly). Gently slide out the whole chassis as much as you can, as you’ll be greeted with ground strap bolted onto the right side of the entire assembly. Use a 8MM wrench in this case if your socket wrench doesn’t fit in the opening.
- Remove all the wiring connections for the radio, but leave the climate ones untouched (as you’ll be moving the whole unit to the new dash kit). At this point of the guide, you should read the Metra Dash Kit manual for the 99-5814 (PDF). The climate control unit is held by four screws. A Torx #15 screwdriver will be needed in this case. Once removed, install the climate controls in the new dash kit and re-use the Torx screws. Now, choose whether you want to do an ISO or DIN mount installation for your aftermarket headunit. I chose the DIN route, even though my headunit supported both methods. Your installation may vary at this point.
- Before you hookup the wire harness to your new headunit, you should turn on the car to initiliaze the XSVI interface, according to the Metra installation instructions. Connect the wire harness to the car but not to the headunit. Turn ignition to the ON position for thirty seconds, then turn the key off. You can now plug in the wire harness to your new stereo and finish up the installation.
- The last step is putting it all back together, which should be straight forward for the installer at this point (everything is in reverse… of course!). Shoving the wire harness in the back might be a bit problematic, but you’ll find a good spot for it somewhere. Connect everything the way it was before. You may want to test your headunit out before screwing all the bolts back in, just to be sure that your hookups are correct. You are on your first step to having great sound in your Tribute… next step is to change the stock speakers to components and add an amplifier… that’ll be my next guide for this car. Enjoy!
Did you end up using the antenna harness?
Metra antenna harness, model #40-CR10
Heya, nope; I don’t listen to the radio at all (no good stations here in Montreal) so I decided not to install it.
I just put in a Pioneer AVIC-Z1 into my 2008 Tribute and I want to attach the illumination wire from the Z1 to the factory wiring harness so the Z1 is not that bright at night…any thoughts as to where I can start?
If I’m not mistaken, there should be an “ILL” wire (yellow) that controls the dimming of the unit. The wiring harness should have taken care of this wire, but if it’s anything like my setup, I couldn’t get the dimming to work. I don’t think the Tribute has any dimming/brightness controls to begin with, least I remember…
Oh, you should be able to manually control the dimming on your Pioneer Z1 by the setup parameters. For example, on my unit, I must navigate to the system setup menu (when the unit is ‘off’: only the time shows) and I can then dim the unit from there.
I don’t know how else we can incorporate the dimming without installing a knob to do so… sorry.
You saved me a bunch of time searching, for exploded dash views, harness and adapted numbers, etc. You are a scholar among men. Thanks.
Welcome!